Welcome to Box King, your one-stop application for crafting custom boxes with ease. Box King offers an array of functions to streamline your box-making process.
Key Features:
Entity Setup: Simplify your workflow with our main entities: Box, Product, Card, Wrapper, and Packing Tape. These entities integrate seamlessly as Shopify products. For example, create a “Box” product, locate it within the app, designate it as a “box” entity, and configure its attributes (like size and discounts). Customers can then effortlessly add products to this box and purchase everything in a single order.
Theme Extensions: Enhance your website with our two versatile widgets. These widgets integrate flawlessly with any theme, offering customizable options to match your brand’s aesthetic.
Multilingual Support: Cater to a global audience by configuring multiple languages for the widgets. This feature ensures that if your store operates in different languages, the application adapts accordingly for a seamless customer experience.
Multicurrency Compatibility: Go global with our multi-currency support. If your store switches between currencies, our application’s widgets will automatically adapt, offering a consistent shopping experience.
Advanced Analytics: Gain insights into your sales performance. Our application provides detailed analytics on the sales of boxes and other entities, helping you identify top-selling products and strategize for increased sales.
Independent Shopping Cart: Due to Shopify limitations, we’ve incorporated an independent cart system within the app. This cart exclusively handles products sold through the app, ensuring security and streamlined shopping.
Embrace the power of Box King to elevate your packaging experience and drive sales with customized, user-friendly solutions.
Entities
Manual
Entities
Box: The box is a central and required entity in our application. Its primary function is to accommodate various products.
Setting Up the Box Size: In the app, you need to configure the size of the box entity. We use a unit system for size measurement. For instance, if you assign size ’10’ to a box and size ‘2’ to a product like a ‘hat’, it implies that up to five hats can be accommodated into the box.
Product Configuration: The product you intend to use as a ‘box’ should have a ‘Size’ option. This option is created within the Shopify admin panel.
Discount setup: In the admin panel of the application for the box you can set a discount. There are two types: a fixed amount or a percentage. The discount applies to the entire order amount.
Product: Products are another fundamental and required entity within the application.
Product Size Setting: For each product, the primary setting to configure is its size. The size functions similarly to the box entity, as described earlier. For example, if you assign a size value to a product, it determines how many such products can fit into a box of a given size.
Product Availability: It’s important to note that if a product is marked as ‘draft’ or is not in stock, it will not be available for sale through the application. This ensures that only available products are displayed and sold, enhancing the shopping experience.
Postcard.
Configuration Simplicity: Setting up a postcard in the application is straightforward. Simply select the desired product in the application. There’s no need for any special settings or configurations.
User Interaction: When a user chooses to add a “Postcard” to their box, they are presented with a unique opportunity to personalize it. They can add text to the postcard, including fields like “From”, “To”, and a custom message. This feature enhances the user’s gift-giving experience, adding a personal touch to their box.
Wrapper and Packing tape.
Step-by-step text instructions for installation and configuration with screenshots.
Manual
Step-by-step text instructions for installation and configuration with screenshots.
In order to install the APP you need to:
go to the partner panel
select application
click on the block Test your app → Select store, then select the desired store for installation
you need to associate the Shopify product with the product dimension entity in the application and configure the dimensions
go to the menu Product dimensions:
select the desired product and click Configure variants:
indicate size to the required options (we can also turn on/off the Unavailable flag for options) and save:
you need to associate the Shopify product with the box entity in the application and configure the dimensions
go to the menu Boxes:
select the desired product and click Configure (important, the product you will link must contain the Size option in the Shopify admin +
indicate size to the required options (we can also turn on/off the Unavailable flag for options) and save
You need to associate the Shopify product with the postcard entity in the application
go to the menu Postcards –
select the desired product and click Configure
turn on/off the Unavailable flag options and save
You need to associate the Shopify product with the wrapper entity in the application
go to the menu Wrappers
select the desired product and click Configure
turn on/off the Unavailable flag options and save
You need to associate the Shopify product with the packing tape entity in the application
go to the menu Tapes
select the desired product and click Configure
turn on/off the Unavailable flag options and save
to create a Pre-build box you need
go to the menu Pre-build boxes
click on the button Create box
specify the name of the box, the name must be unique
[optional] on/off flag Make it unavailable for sale
in the search form, find and select the box we are interested in, which we created at the previous stage, then select the box option we are interested in +
click on Add products, in the pop-up select the products we are interested in, which should be in the box + +
activate Add postcard, in the search form find and select the postcard we are interested in and its variant, which we created at the previous stage + +
activate Add wrap, in the search form find and select the wrap we are interested in and its variant, which we created in the previous step + +
activate Add tape, in the search form find and select the packaging tape we are interested in and its variant, which we created in the previous step + +
click Save to save the pre-build box ,
[optional] To configure text and language translations for the store widget you need
go to menuLanguage
optionally create another language and complete text translations + +
Setting up application widgets:
The application has 2 widgets
Box configuration – required, allows the user to manually assemble the box
Pre-build boxes – optional, allows you to select an already configured box and add it directly to your cart
To configure widgets:
you need to go to the store customizer
to add a “Box configuration” widget: click “App embeds” -> select “Box configuration” -> turn on the toggler.
to add “Pre-build boxes” widget: in the Template menu select Add section -> Apps -> Pre-build boxes and place the block.
save changes
Checking the application in the store:
Placing an order with the manual assembly of the box
go to the store
select the box configuration icon
once the popup opens:
the first step is to select the box in which we want to put the products
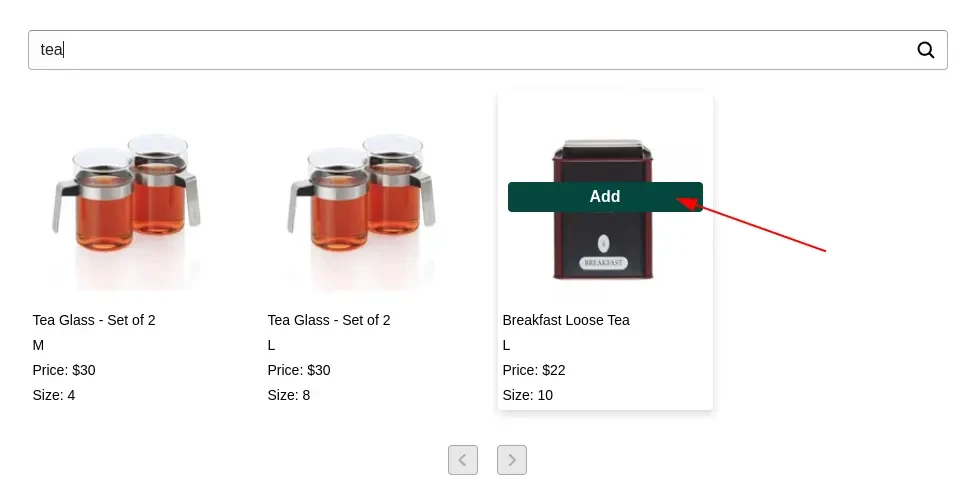
next, we need to select the products we want to put into the box +
[optional] then select a postcard +
[optional] next select the wrapper + +
[optional] then select packing tape
at the Done step, click Cart
then click Checkout
then fill out the delivery and payment form
pay for the order
placing an order with a pre-created box
in the Prebuild boxes block, select a box (you can add it directly to the cart, or you can view the contents through Quick View) and add it to the cart
click on the box configuration icon (widget)
go directly to the Cart block in the widget
then click Checkout
then fill out the delivery and payment form
pay for the order
[optional] You can go to the admin panel and select the Analytics menu, where you can view product sales analytics in the context of boxes
Privacy policy
Manual
Privacy policy
Our application allows you to build your own bundles, and create and fill custom boxes.
Personal Information the App Collects
When you install the App, we are automatically able to access certain types of information from your Shopify account: Products, Collections, Draft orders, Orders, and Customers(only id).
Our application stores only the information that is necessary for its operation.
Our application does not store the personal data of online shop customers
Sharing Your Personal Information
The App does not integrate with any third-party tools, meaning that no third party can have access to any personal information.
Changes
We may update this privacy policy from time to time in order to reflect, for example, changes to our practices or for other operational, legal, or regulatory reasons.
Contact Us
For more information about our privacy practices, if you have questions, or if you would like to make a complaint, please contact us by e-mail at support@utdapp.tech
Contact us
Support
Contact us
Box King App Support.
If you need any help with your Box King App, feel free to reach out to us by email.
We typically reply during business hours 8 am – 5 pm (Brussels, GMT +02:00), Monday-Friday (excluding holidays).
Reach out via the contact form below, or send us a direct email at support@utdapp.tech